User Defined Pipeline for Python-Blosc2
The Blosc Development Team is happy to announce that the latest version of Python-Blosc2 allows user-defined Python functions all throughout its compression pipeline: you can use Python for building prefilters, postfilters, filters, codecs for Blosc2 and explore all its capabilities. And if done correctly (by using e.g. NumPy, numba, numexpr...), most of the time you won't even need to translate those into C for speed.
The Blosc2 pipeline
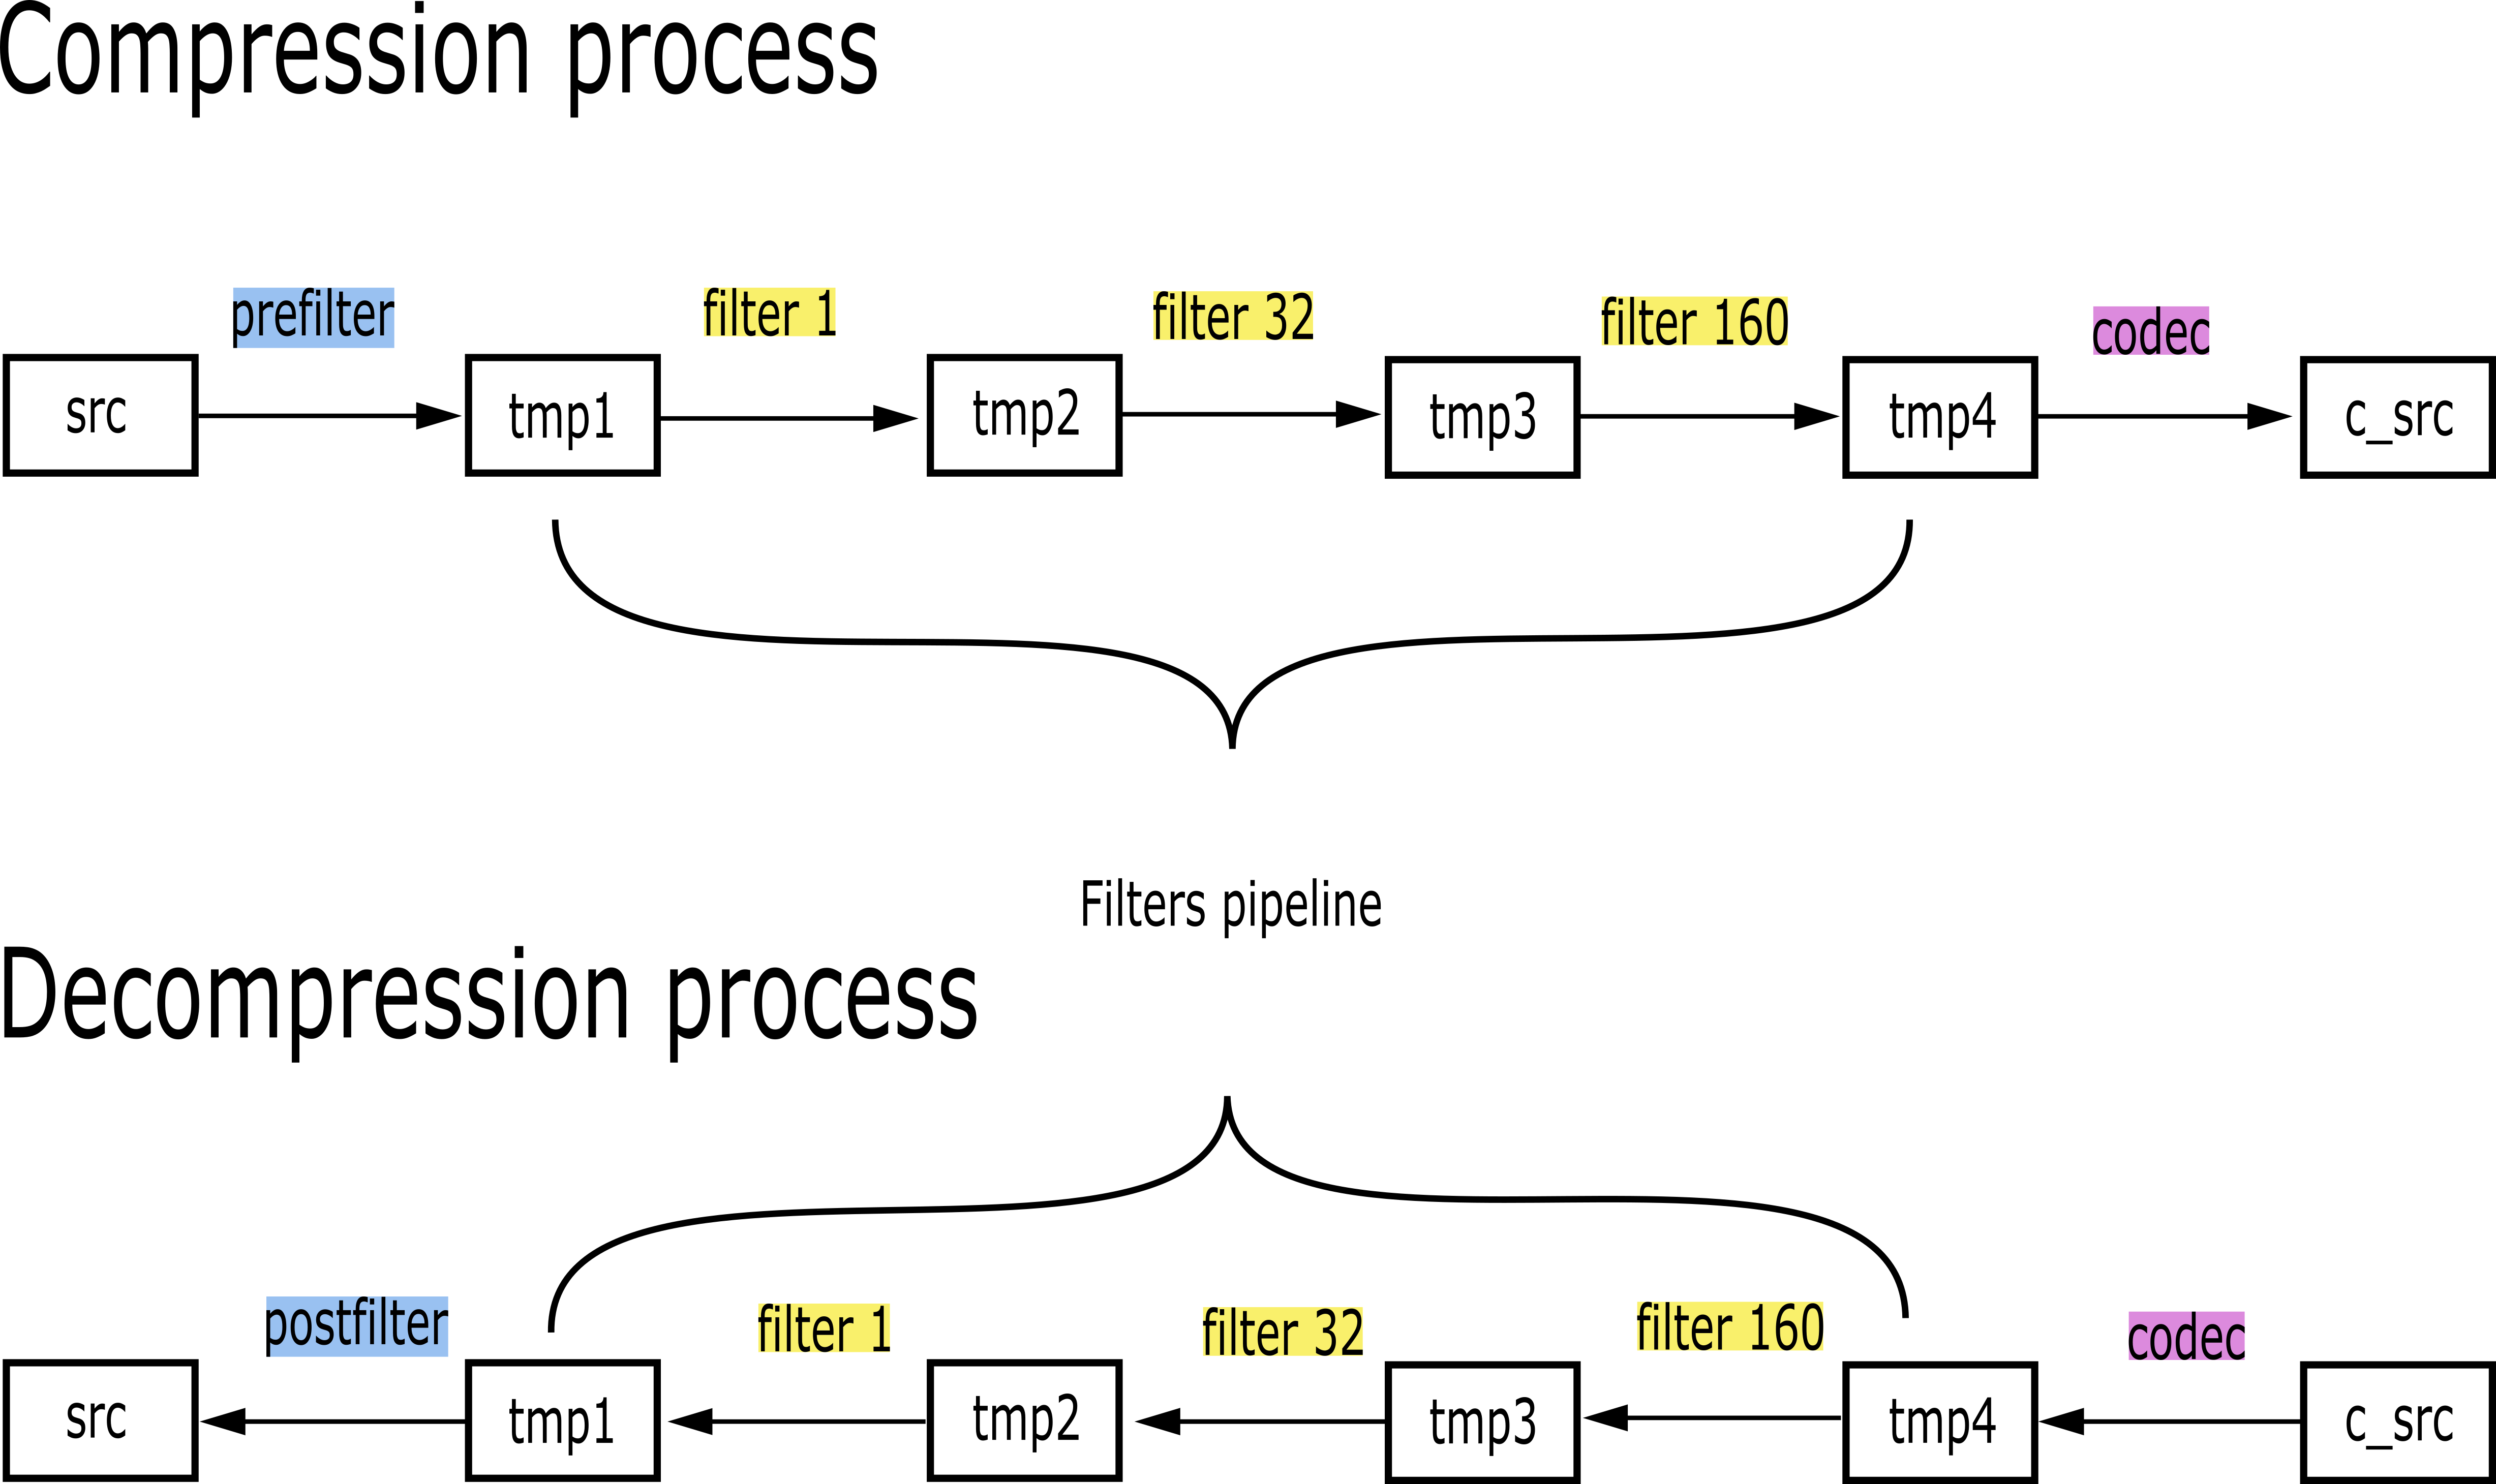
The Blosc2 pipeline includes all the functions that are applied to the data until it is finally compressed (and decompressed back). As can be seen in the image below, during compression the first function that can be applied to the data is the prefilter (if any), then the filters pipeline (with a maximum of six filters) and, last but not least, the codec itself. For decompressing, the order will be the other way around: first the codec, then the filters pipeline and finally the postfilter (if any).
Defining prefilters and postfilters
A prefilter is a function that is applied to the SChunk each time you add data into it (e.g. when appending or updating). It is executed for each data block and receives three parameters: input, output and offset. For convenience, the input and output are presented as NumPy arrays; the former is a view of the input data and the later is an empty NumPy array that must be filled (this is actually what the first filter in the filters pipeline will receive). Regarding the offset, it is an integer which indicates where the corresponding block begins inside the SChunk container.
You can easily set a prefilter to a specific SChunk through a decorator. For example:
schunk = blosc2.SChunk()
@schunk.prefilter(np.int64, np.float64)
def pref(input, output, offset):
    output[:] = input - np.pi + offset
This decorator requires the data types for the input (original data) and output NumPy arrays, which must be of same itemsize.
If you do not want the prefilter to be applied anymore, you can always remove it:
schunk.remove_prefilter("pref")
As for the postfilters, they are applied at the end of the pipeline during decompression. A postfilter receives the same parameters as the prefilter and can be set in the same way:
@schunk.postfilter(np.float64, np.int64)
def postf(input, output, offset):
    output[:] = input + np.pi - offset
In this case, the input data is the one from the buffer returned by the filter pipeline, and the output data type should be the same as the original data (for a good round-trip).
You can also remove postfilters whenever you want:
schunk.remove_postfilter("postf")
Fillers
Before we move onto the next step in the pipeline, we need to introduce the fillers. A filler is similar to a prefilter but with a twist. It is used to fill an empty SChunk and you can pass to it any extra parameter you want, as long as it is a NumPy array, SChunk or Python Scalar. All these extra parameters will arrive to the filler function as a tuple containing just the corresponding block slice for each parameter (except for the scalars, that are passed untouched). To declare a filter, you will also need to pass the inputs along with its data type. For example:
@schunk.filler(((schunk0, dtype0), (ndarray1, dtype1), (py_scalar3, dtype2)), schunk_dtype)
def filler(inputs_tuple, output, offset):
    output[:] = inputs_tuple[0] - inputs_tuple[1] * inputs_tuple[2]
This will automatically append the data to the schunk, but applying the filler function first. After that the schunk would be completely filled, the filler will be de-registered, so the next time you update some data the it would not be executed; a filler is meant to build new SChunk objects from other containers.
User-defined filters and codecs
The main difference between prefilters/postfilters and their filters/codecs counterparts is that the former ones are meant to run for an specific SChunk instance, whereas the later can be locally registered and hence, used in any SChunk.
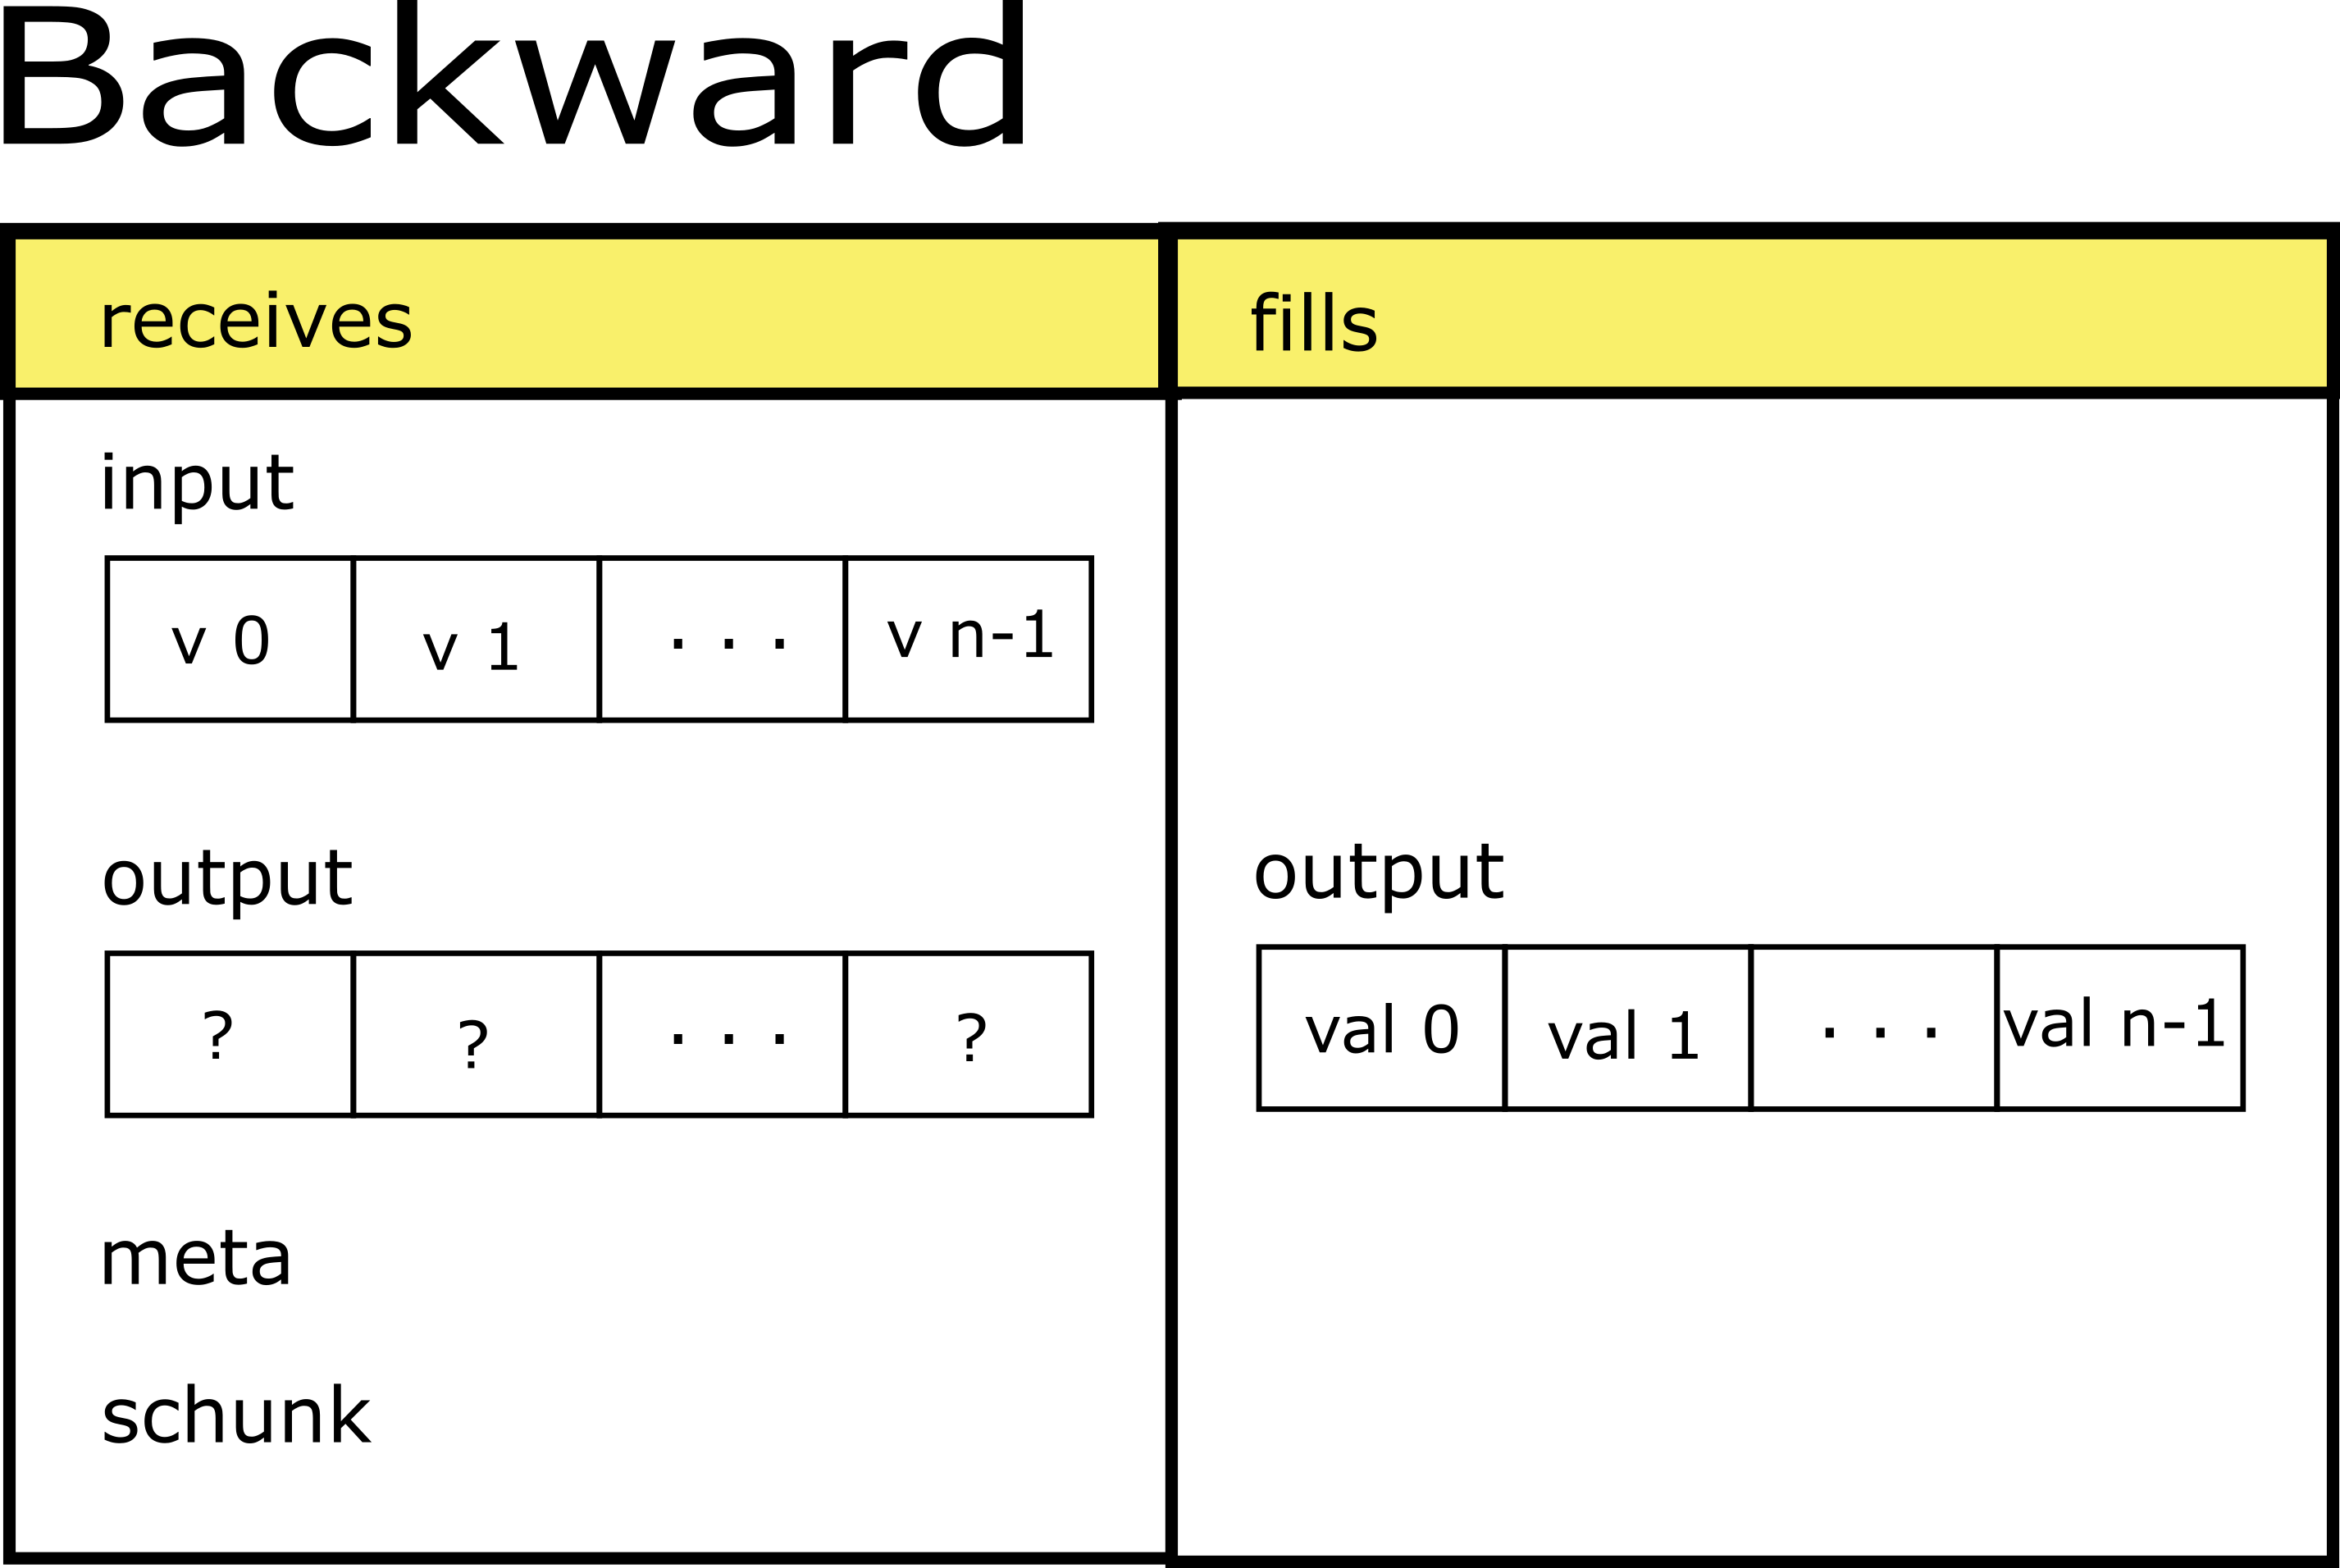
Let's start describing the user-defined filters. A filter is composed by two functions: one for the compression process (forward), and another one for the decompression process (backward). Such functions receive the input and output as NumPy arrays of type uint8 (bytes), plus the filter meta and the SChunk instance to which the data belongs to. The forward function will fill the output with the modified data from input. The backward will be responsible of reversing the changes done by forward so that the data returned at the end of the decompression should be the same as the one received at the beginning of the compression. Check the drawing below:

So, once we have the pair of forward and backward functions defined, they can be registered locally associating to a filter ID between 160 and 255:
blosc2.register_filter(id, forward, backward)
Now, we can use the user-defined filter in any SChunk instance by choosing the new local ID in the filters pipeline:
schunk.cparams = {"filters": [id], "filters_meta": [meta]}
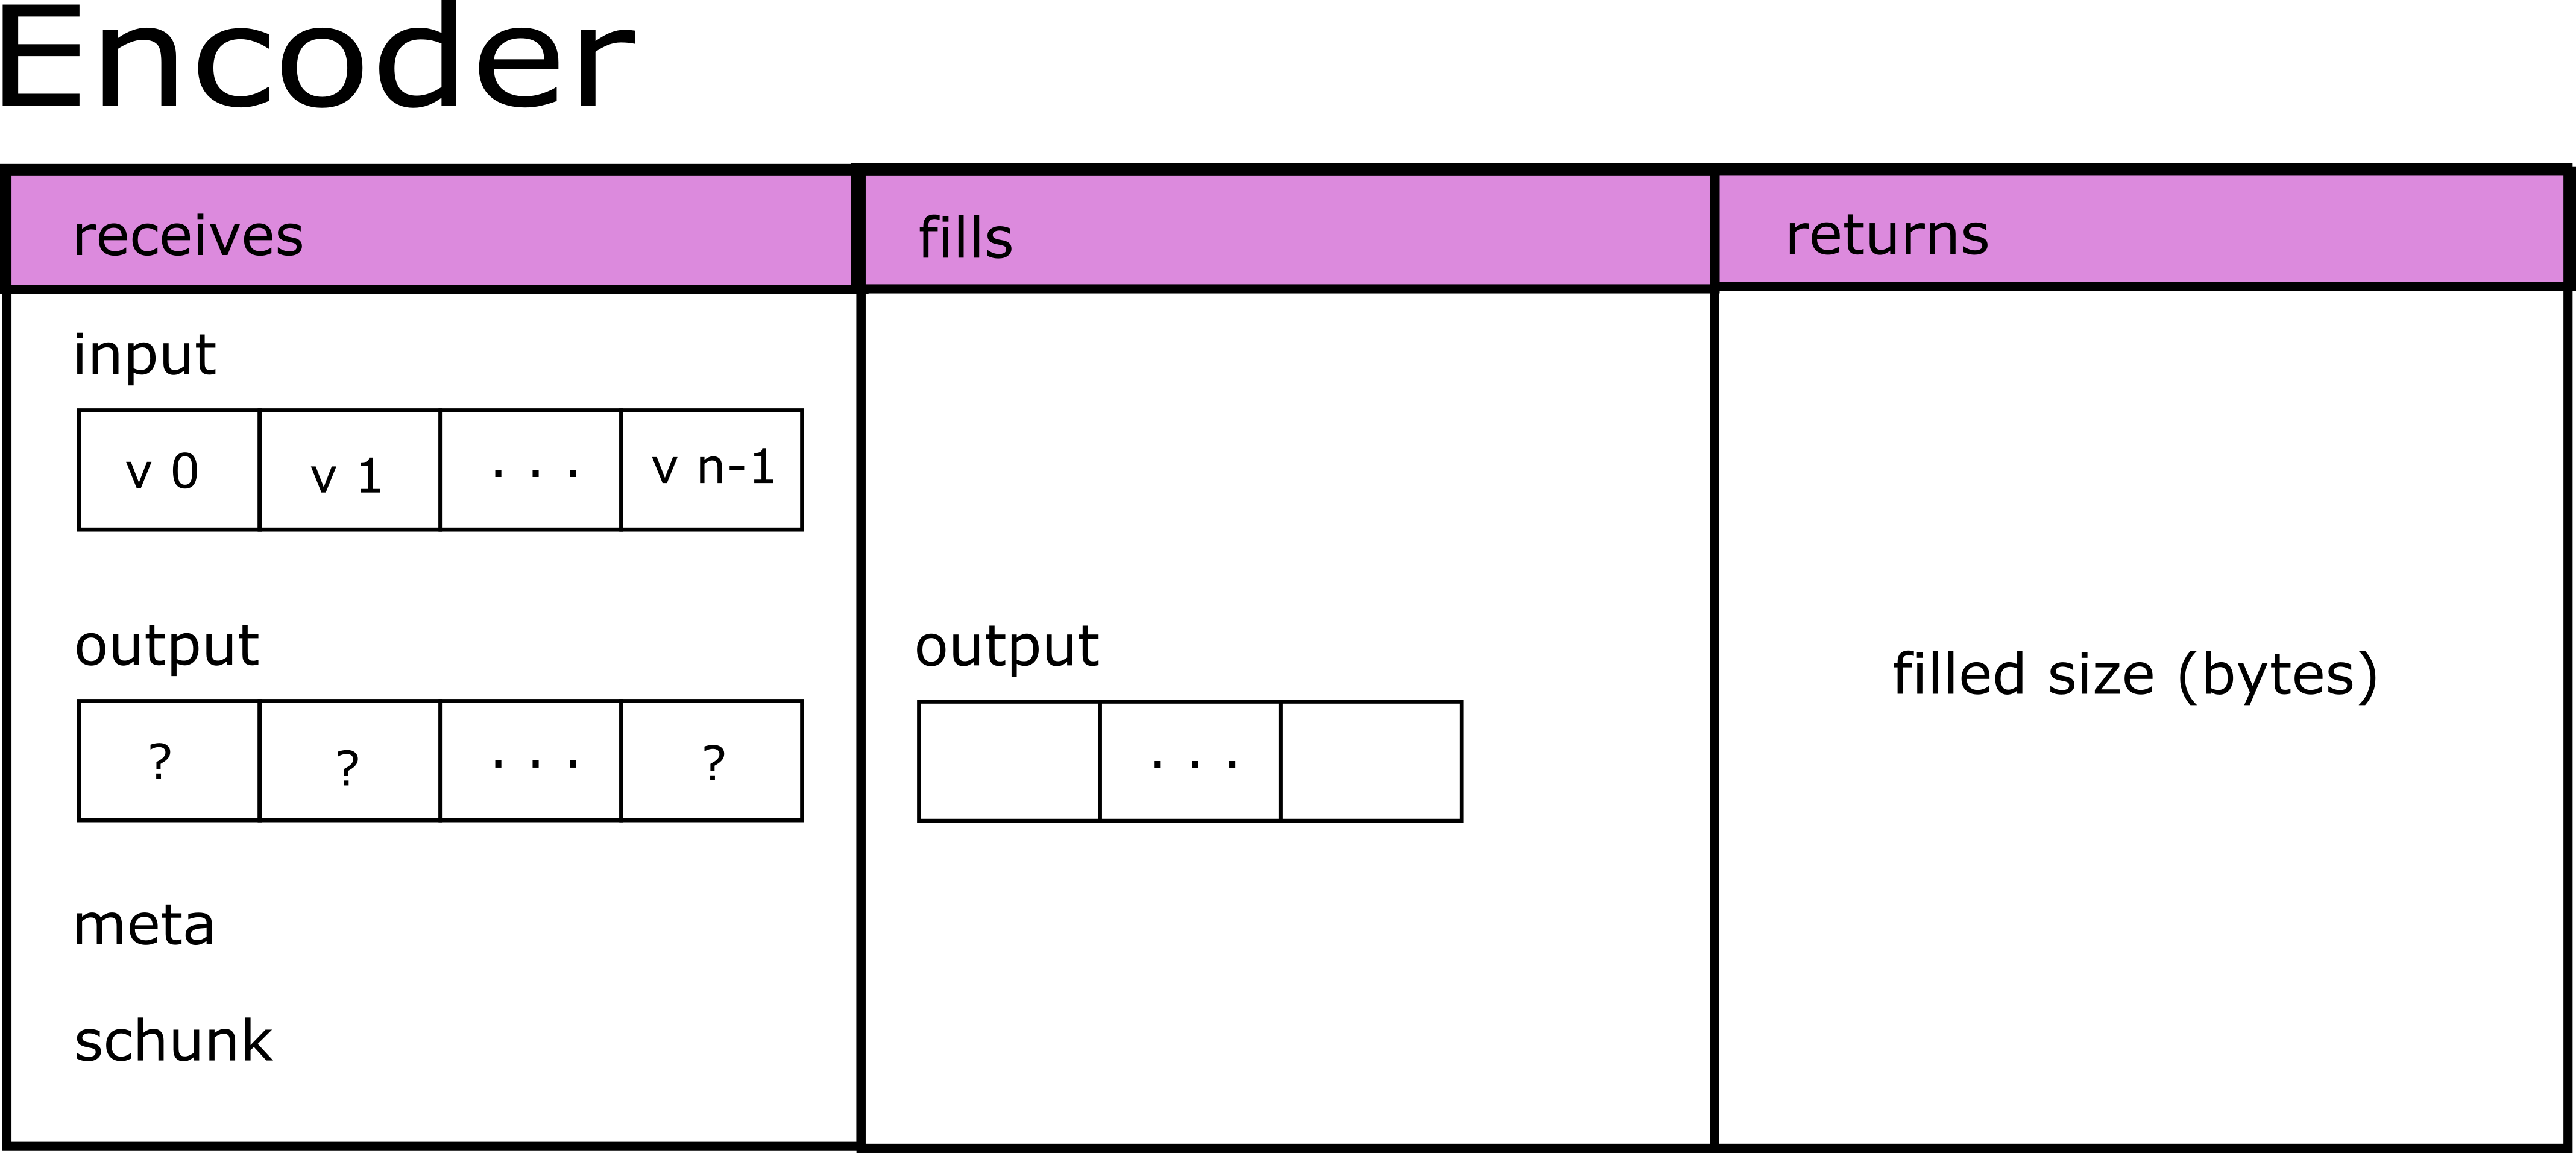
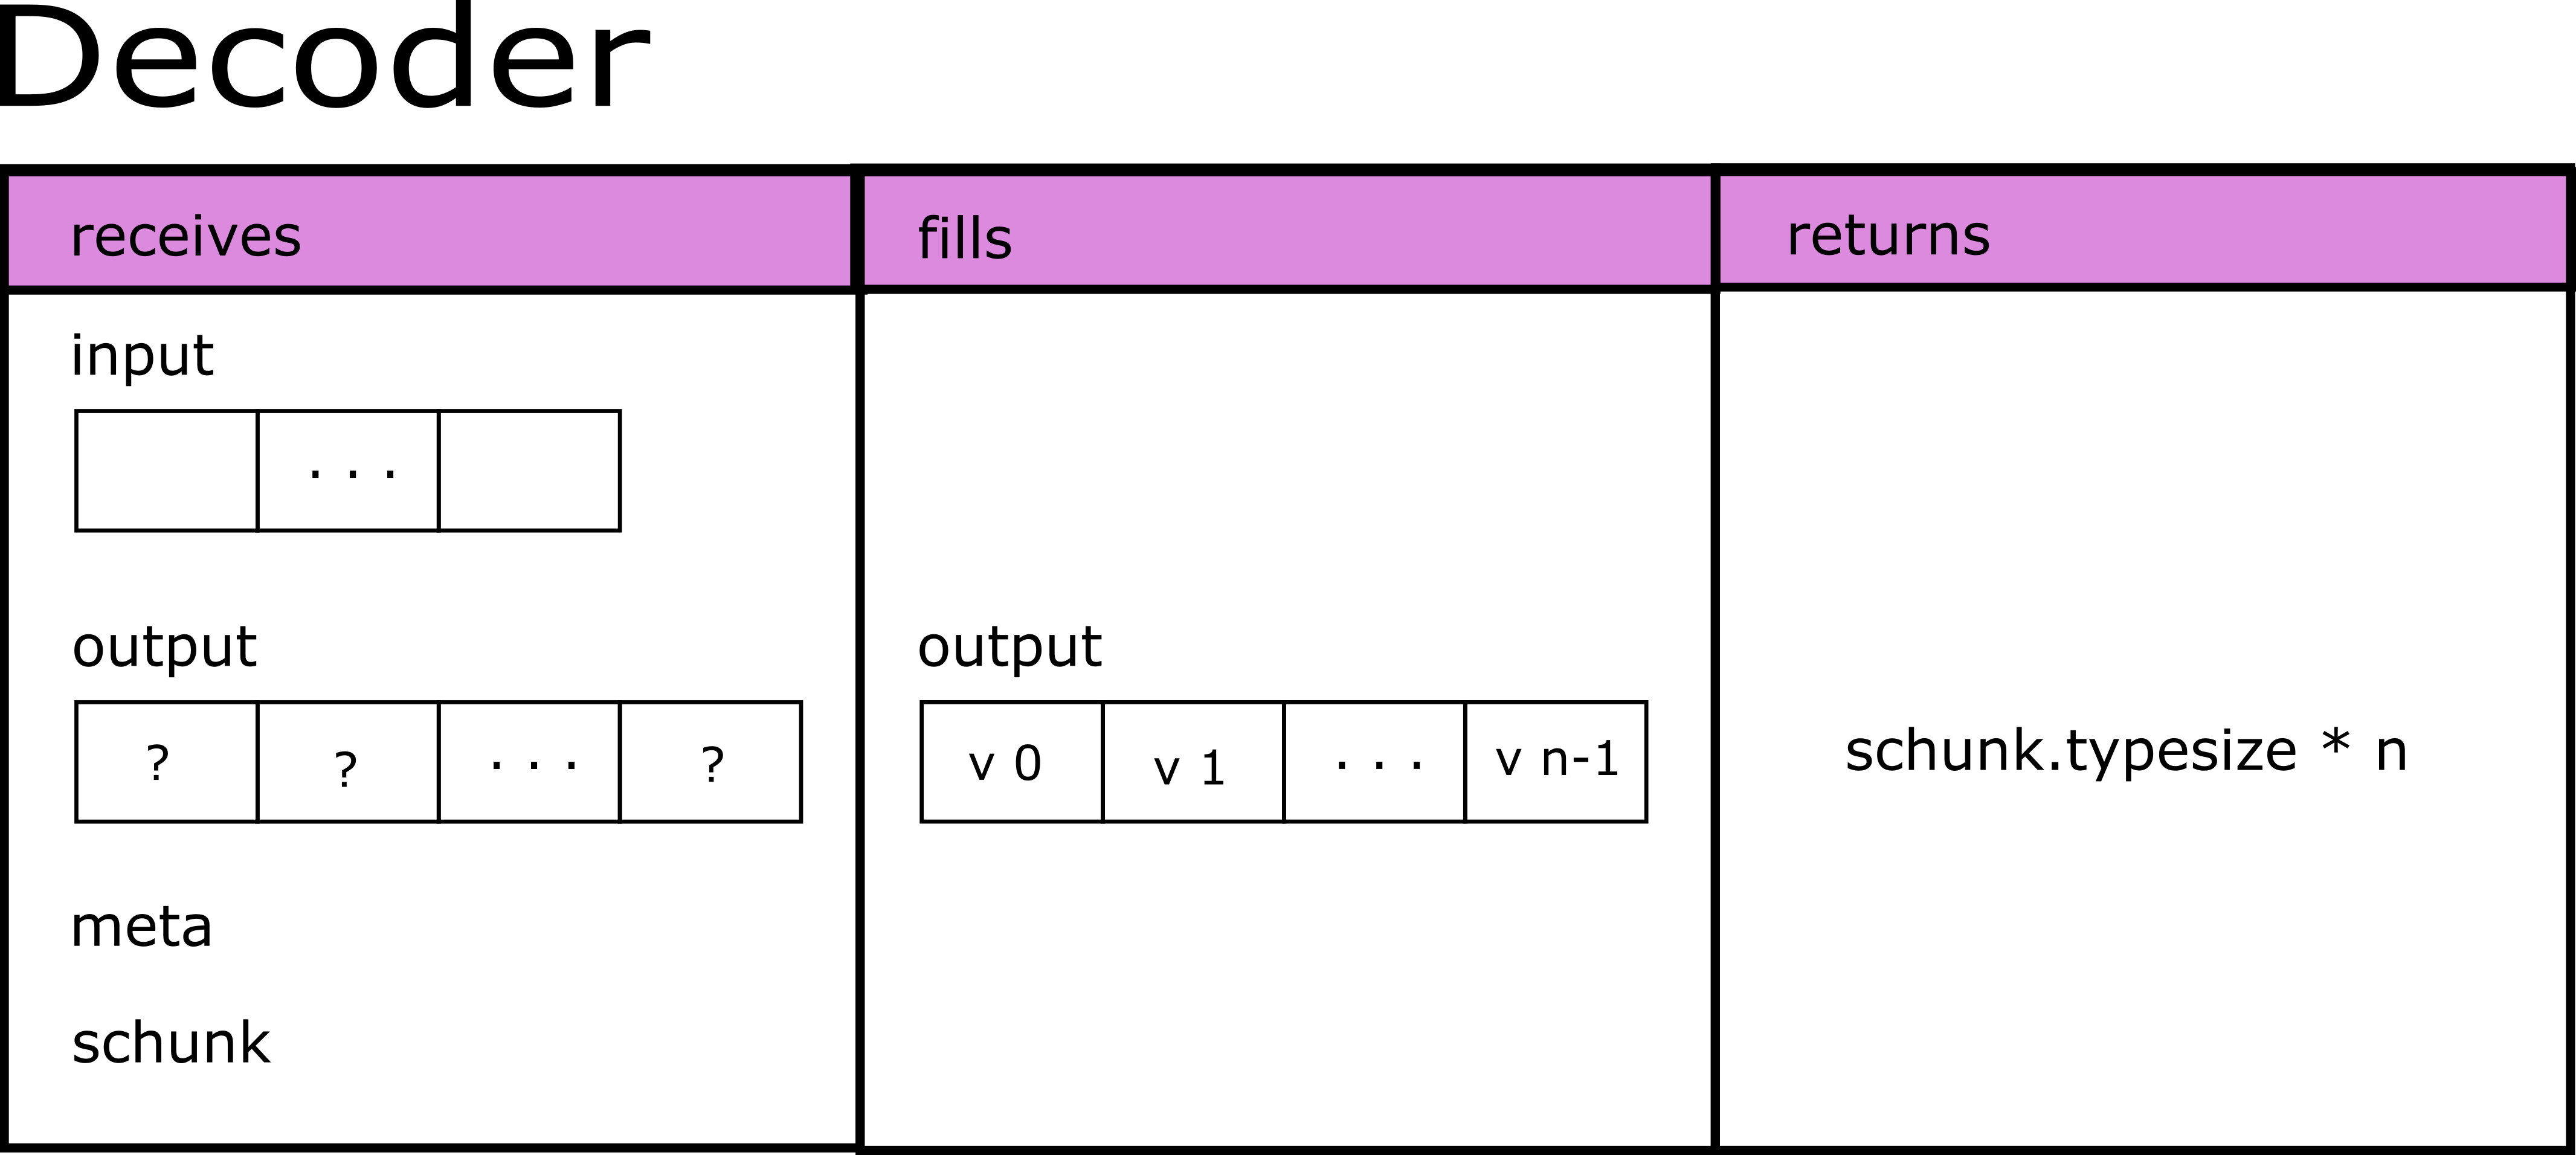
Regarding the user-defined codecs, they do not differ too much from its filter counterparts. The main difference is that, because their goal is to actually compress data, the corresponding functions (in this case encoder and decoder) will need to return the size in bytes of the compressed/decompressed data respectively. This time the scheme would be:
To register a codec, you name it, assign an ID to it and pass the user-defined functions:
blosc2.register_codec(codec_name, id, encoder, decoder)
And to use it you just use its ID in the cparams:
schunk.cparams = {"codec": id, "codec_meta": meta}
Final words
We have seen how easily you can define your own filters and codecs for the Blosc2 compression pipeline. They are very easy to use because they conveniently wrap input and output data as NumPy arrays. Now, you can start experimenting with different filter/compression algorithms straight from Python. You can even come with a library of such filters/codecs that can be used in all your data pipeline processing. Welcome to compression made easy!
See more examples in the repository.
Find the complete documentation at: https://www.blosc.org/python-blosc2/python-blosc2.html.
This work has been made thanks to a Small Development Grant from NumFOCUS. NumFOCUS is a non-profit organization supporting open code for better science. If you like this, consider giving a donation to them (and if you like our work, you can nominate it to our project too!). Thanks!
Comments
Comments powered by Disqus