New grok plugin for Blosc2
Update 2024-01-04: Use the new global plugin ID for the grok codec in the examples.
The Blosc Development Team is happy to announce that the first public release (0.2.0) of blosc2-grok is available for testing. This dynamic plugin is meant for using the JPEG2000 codec from the grok library as another codec inside Blosc2 (both from C and Python).
In this blog we will see how to use it as well as the functionality of some parameters. To do so, we will depict an already created example. Let's get started!
Why JPEG2000?
It can be stated that currently the best compromise between image quality and compression factor is JPEG2000. This image compression standard has been in use for over 20 years and is widely accepted in the imaging community due to its ability to achieve a compression factor of approximately 10x without significant loss of information.
JPEG2000 has been implemented in many libraries, but the one that stands out is the grok library because of its speed and completeness. This is why we have chosen it to be the first image codec to be added to Blosc2.
Installing the plugin
First of all, you will need to install the blosc2-grok plugin. You can do it with:
pip install blosc2-grok
That's it! You are ready to use it.
Using the grok codec via the plugin
The grok codec has been already registered as a global plugin for Blosc2, so you only need to use its plugin id (blosc2.Codec.GROK) in the codec field of the cparams:
# Define the compression parameters. Disable the filters and the
# splitmode, because these don't work with the codec.
cparams = {
    'codec': blosc2.Codec.GROK,
    'filters': [],
    'splitmode': blosc2.SplitMode.NEVER_SPLIT,
}
It is important to disable any filter or splitmode, since we don't want the data to be modified before proceeding to the compression using grok.
Now, imagine you have an image as a NumPy array (let's say, created using pillow), and you want to compress via blosc2_grok. Before, you will need to tell blosc2-grok which format to use among the available ones in the grok library (we will get through the different parameters later):
# Set the parameters that will be used by the codec
kwargs = {'cod_format': blosc2_grok.GrkFileFmt.GRK_FMT_JP2}
blosc2_grok.set_params_defaults(**kwargs)
And finally, you are able to compress the image with:
bl_array = blosc2.asarray(
    np_array,
    chunks=np_array.shape,
    blocks=np_array.shape,
    cparams=cparams,
    urlpath="myfile.b2nd",
    mode="w",
)
We already have compressed our first image with blosc2-grok!
In this case, the chunks and blocks params of Blosc2 have been set to the shape of the image (including the number of components) so that grok receives the image as a whole and therefore, can find more opportunities to compress better.
Setting grok parameters
We have already used the cod_format grok parameter to set the format to use with the blosc2_grok.set_params_defaults(), but blosc2-grok lets you set many other parameters. All of them are mentioned in the README. When possible, and to make it easier for existing users, these parameters are named the same than in the Pillow library.
For example, let's see how to set the quality_mode and quality_layers params, which are meant for lossy compression. So, realize you don't care too much about the quality but want a compression ratio of 10x. Then, you would specify the quality_mode to be rates and the quality_layers to 10:
kwargs = {'cod_format': blosc2_grok.GrkFileFmt.GRK_FMT_JP2}
kwargs['quality_mode'] = 'rates'
kwargs['quality_layers'] = np.array([10], dtype=np.float64)
blosc2_grok.set_params_defaults(**kwargs)
With that, you will be able to store the same image than before, but with a compression ratio of 10x. Please note that the quality_layers parameter is a numpy array. By the way, specifying more than one element here will produce different layers of quality of the original image, but this has little use in Blosc2, since it is better to store different layers in different NDArray objects (or files).
Now, just like in Pillow, quality_mode can also be expressed in dB, which indicates that you want to specify the quality as the peak signal-to-noise ratio (PSNR) in decibels. For example, let's set a PSNR of 45 dB (which will give us a compression of 9x):
kwargs['quality_mode'] = 'dB'
kwargs['quality_layers'] = np.array([45], dtype=np.float64)
Another useful parameter if you want to speed things up is the num_threads parameter. Although grok already sets a good default for you, you can set it to some other value (e.g. when experimenting the best one for your box). Or, if you would like to deactivate multithreading, you can set it to 1:
kwargs['num_threads'] = 1
For example, in a MacBook Air laptop with Apple M2 CPU (8-core), the speed difference when performing lossless compression between the single thread setting and the default thread value is around 6x, so expect quite large accelerations by leveraging multithreading.
Visual example
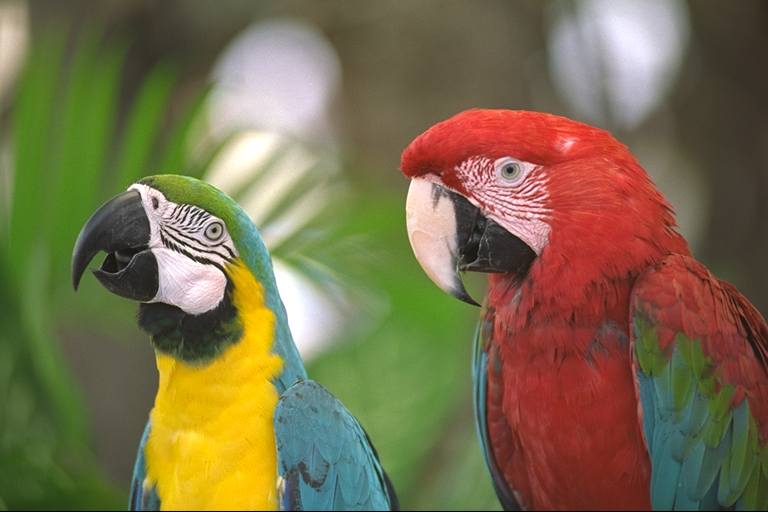
Below we did a total of 3 different compressions. First an image using lossless compression showing the original image:

Then, a couple of images using lossy compression: one with 10x for rates quality mode (left) and another with 45dB for dB quality mode (right):
|
|
As can be seen, the lossy images have lost some quality which is to be expected when using this level of compression (around 10x), but the great quality of the JPEG2000 codec allows us human beings to still perceive the image quite well.
A glimpse on performance
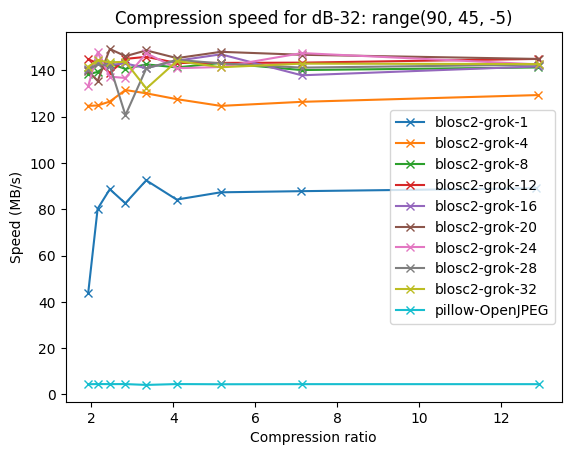
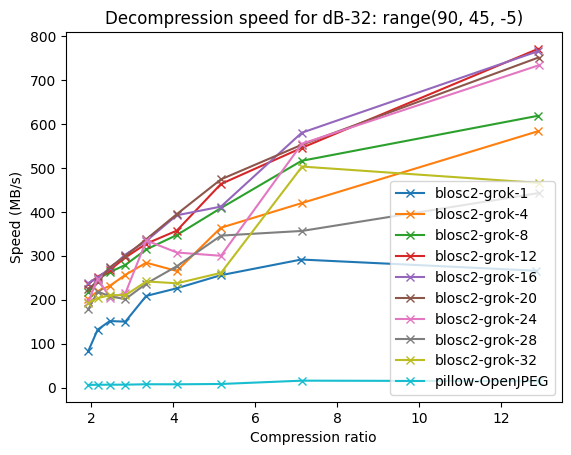
The combination of the great implementation of the JPEG2000 codec in grok and the multithreading capabilities of Blosc2 allow to compress, but specially decompress, the image very fast (benchmark run on an Intel i9-13900K CPU):


One can see that the compression speed is quite good (around 140 MB/s), but that the decompression speed is much faster (up to 800 MB/s). See how, in comparison, the compression speed of the JPEG2000 in Pillow (via the OpenJPEG codec) is much slower (around 4.5 MB/s max.) and so is the decompression speed (around 16 MB/s max.).
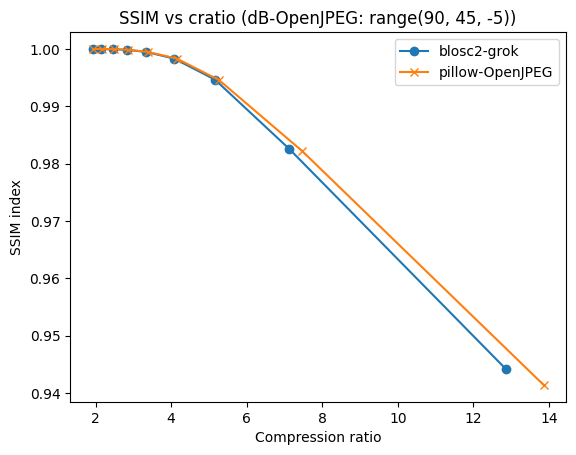
Besides, both grok and OpenJPEG can achieve very similar quality when using similar compression ratios. For example, when using the structural similarity index measure (SSIM) to compare the original image with the decompressed one, we get the following results:

Actually, the flexibility of the double partitioning in Blosc2 allows for quite a few ways to divide the workload during compression/decompression, affecting both speed and quality, but we will leave this discussion for another blog. If you are interested in this topic, you can have a look at the blosc2-grok benchmarks.
Conclusion
The addition of the grok plugin to Blosc2 opens many possibilities for compressing images. In the example we used a RGB image, but grayscale images, up to 16-bit of precision, can also be compressed without any problem.
Although fully usable, this plugin is still in its early stages, so we encourage you to try it out and give us feedback; we will be happy to hear from you!
Thanks to the LEAPS consortium for sponsoring this work, and NumFOCUS for their continuous support through the past years. Thanks also to Aaron Boxer, for the excellent grok library, and for his help in making this plugin possible. If you like what we are doing in the Blosc world, please consider donating to the project.


Comments
Comments powered by Disqus